 Save Pin
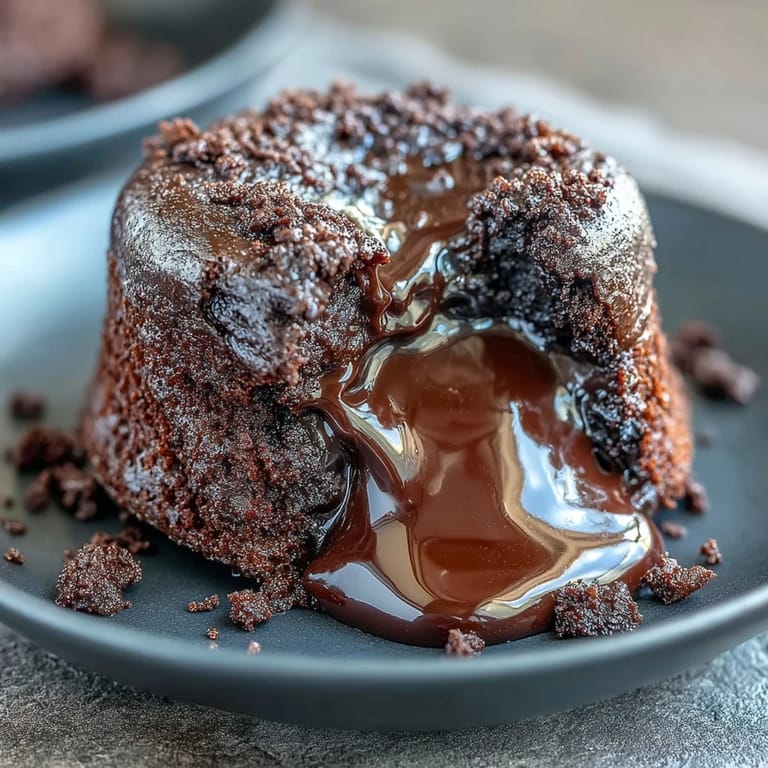
 The timer beeped at midnight, and I stood there watching four ramekins wobble on the oven rack, their tops cracked just enough to hint at something molten underneath. I had been craving chocolate all week, the kind that oozes and surprises you, and suddenly it felt urgent to figure out how to make that happen in my own kitchen. My first attempt collapsed into a puddle, my second baked through completely, but the third time I pulled them out with shaky hands and inverted one onto a plate, the center spilled out like a secret. I texted a photo to my sister at 12:14 a.m., and she replied with three flame emojis and the words "bring me one now." That's when I knew I'd cracked it.
I made these for my friend's birthday dinner once, and I remember the silence that fell over the table when we cracked into them with our spoons. Someone murmured "oh my god" through a mouthful of chocolate, and someone else scraped their plate so clean it gleamed under the candlelight. Later, while washing dishes, my friend admitted she'd been nervous about turning thirty, but somehow that dessert made the night feel celebratory instead of scary. Food has a way of doing that, turning a moment into a memory you hold onto.
Ingredients
- Bittersweet or semisweet chocolate (115 g): Use good quality chocolate here, the kind you'd enjoy eating on its own, because it's the backbone of the entire cake and cheap chocolate will taste flat and waxy.
- Unsalted butter (115 g): Melts into the chocolate to create that silky, pourable batter, and using unsalted lets you control the seasoning perfectly.
- Eggs (2 whole, 2 yolks): The extra yolks add richness and help create that tender, molten center that makes these cakes famous.
- Granulated sugar (100 g): Just enough sweetness to balance the bitterness of the chocolate without tipping into cloying territory.
- All-purpose flour (30 g): A small amount gives structure without weighing down the batter, so the center stays gooey while the edges set.
- Instant espresso powder (1 tsp): This is the secret weapon that makes the chocolate taste more like itself, amplifying every nuance without announcing coffee.
- Pure vanilla extract (1 tsp): Rounds out the flavors and adds a warmth that ties everything together.
- Pinch of salt: Brightens the chocolate and keeps the sweetness from feeling one-dimensional.
Tired of Takeout? 🥡
Get 10 meals you can make faster than delivery arrives. Seriously.
One email. No spam. Unsubscribe anytime.
Instructions
- Prep the ramekins:
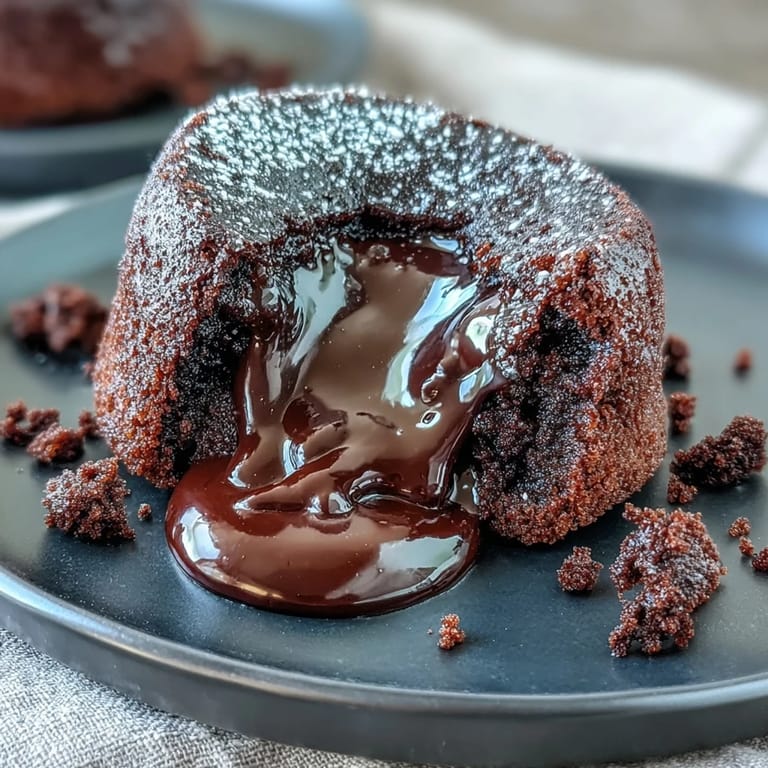
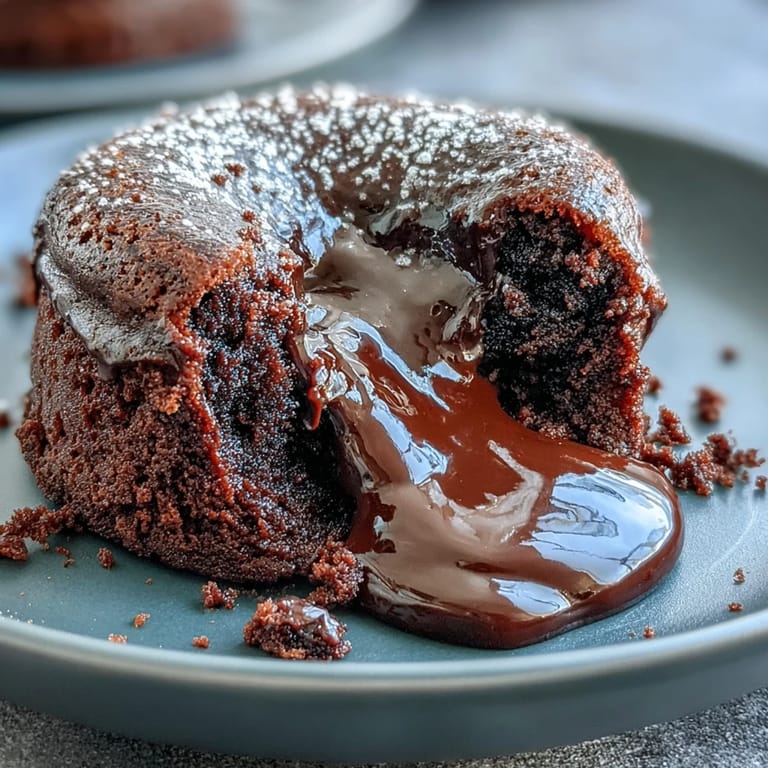
- Preheat your oven to 220°C (425°F), then butter the inside of four ramekins generously and dust them with cocoa powder, tapping out any excess. This step is crucial, it's what lets the cakes slide out cleanly when you invert them, creating that dramatic reveal.
- Melt the chocolate and butter:
- Set a heatproof bowl over a pan of gently simmering water, add the chopped chocolate and butter, and stir until everything melts into a glossy pool. Let it cool for a few minutes so it doesn't scramble the eggs later.
- Whisk the eggs and sugar:
- In a separate bowl, whisk together the whole eggs, egg yolks, and sugar until the mixture turns pale and thickens slightly, about 2 to 3 minutes. You're building volume and airiness here, which helps the cakes rise and creates texture.
- Add espresso and vanilla:
- Stir the espresso powder and vanilla extract into the cooled chocolate mixture until fully dissolved. The espresso will seem to disappear, but trust me, it's working its magic in the background.
- Combine chocolate and eggs:
- Gently fold the chocolate mixture into the egg mixture using a spatula, moving slowly and deliberately. You want to keep as much air in the batter as possible while blending everything into a uniform, glossy mass.
- Fold in flour and salt:
- Sift the flour and salt over the batter, then fold just until you can't see any dry streaks. Overmixing will make the cakes dense and tough, so stop as soon as it comes together.
- Fill and bake:
- Divide the batter evenly among your prepared ramekins, set them on a baking sheet, and slide them into the oven for 11 to 13 minutes. The edges should look set and slightly puffed, but the centers will still jiggle when you gently shake the pan.
- Rest and invert:
- Let the cakes sit for one minute after pulling them from the oven, then run a thin knife around the edges to loosen them. Invert each ramekin onto a dessert plate, tap the bottom gently, and lift away to reveal the cake.
 Save Pin
 One winter evening, I served these to my parents after a long, quiet dinner where we'd mostly talked about practical things, bills and repairs and schedules. But when my dad broke into his cake and the chocolate spilled out onto the plate, he looked up at me with surprise, then smiled in this soft, unexpected way. My mom reached over and squeezed my hand, and for a minute the kitchen felt warmer, like we'd all been reminded that small indulgences matter. Sometimes dessert is just the thing that lets everyone exhale.
Serving Suggestions
A scoop of cold vanilla ice cream on top is classic for a reason, the contrast of hot molten chocolate against icy cream is pure heaven. Whipped cream works beautifully too, especially if you add a splash of bourbon or a pinch of cinnamon to it. Fresh raspberries or a few mint leaves on the side add a pop of color and a hint of brightness that cuts through the richness. I've also dusted the plates with powdered sugar or drizzled a little caramel sauce around the base, turning a simple dessert into something that looks like it came from a restaurant.
Make Ahead Tips
You can prepare the batter up to four hours in advance, pour it into the ramekins, cover them with plastic wrap, and keep them in the fridge. Just remember to bring them back to room temperature for about 20 minutes before baking, or they'll need an extra minute or two in the oven and the timing gets trickier. I've also frozen unbaked batter in ramekins, wrapped tightly, and baked them straight from frozen by adding about five minutes to the bake time. It's a great trick when you want to have an impressive dessert ready to go at a moment's notice.
Flavor Variations
If you want to play around with the flavors, try stirring in a tablespoon of orange zest to the chocolate mixture for a subtle citrus note that feels elegant. A splash of rum or Grand Marnier in place of some of the vanilla adds a grown-up warmth that's perfect for dinner parties. For a more intense coffee experience, bump the espresso powder up to one and a half teaspoons, or even fold in a few chocolate-covered espresso beans for texture.
- Add a pinch of cayenne pepper to the batter for a gentle heat that sneaks up on you.
- Swap the espresso powder for matcha powder if you want a surprising green tea twist.
- Press a square of salted caramel or a spoonful of peanut butter into the center of each ramekin before baking for a hidden surprise.
 Save Pin
 These little cakes have become my go-to whenever I want to remind someone that they're worth the effort, worth the good chocolate and the careful timing and the moment of suspense when you flip them onto the plate. There's something about a dessert that reveals itself slowly, one spoonful at a time, that feels like a small act of love.
Questions & Answers
- → How do I know when the lava cakes are done baking?
The edges should be set and firm while the centers remain soft and jiggly. Bake for 11-13 minutes at 425°F - the tops will look set but the middle will still move slightly when gently shaken.
- → Can I make the batter ahead of time?
Yes, you can prepare the batter several hours in advance and refrigerate it in the ramekins. Just remember to bring them to room temperature for about 20-30 minutes before baking for even cooking.
- → What type of chocolate works best?
Bittersweet or semisweet chocolate with 60-70% cacao content works perfectly. Higher quality chocolate yields richer flavor and a smoother molten center.
- → Why add espresso powder to chocolate desserts?
Espresso powder enhances and deepens the chocolate flavor without making the dessert taste like coffee. It adds complexity and richness to the overall taste profile.
- → Can I use different sized ramekins?
The 6 oz size is ideal for proper baking time and molten center results. Larger ramekins may need additional baking time, while smaller ones require less, which could affect the lava effect.
- → How do I prevent the cakes from sticking to the ramekins?
Thoroughly butter the ramekins and dust with cocoa powder, tapping out excess. This creates a non-stick coating and adds extra chocolate flavor to the exterior.