 Save Pin
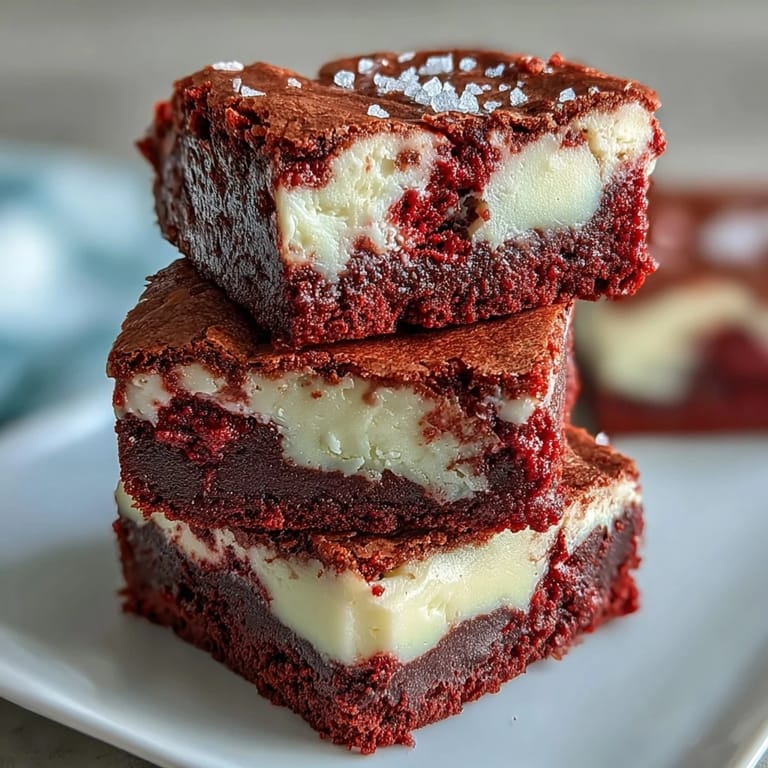
 I was standing in my kitchen on a rainy Saturday, staring at a block of cream cheese and leftover cocoa powder, when the idea hit me. Why not combine two of my favorite indulgences into one outrageously decadent dessert? The red velvet batter swirled into tangy cheesecake looked almost too pretty to bake, but once that first batch came out of the oven with its marbled top and fudgy center, I knew I'd created something worth sharing. These brownies have since become my go-to whenever I need to impress without spending all day in the kitchen.
The first time I brought these to a family gathering, my aunt nearly dropped her coffee cup when she saw the vibrant swirls. She took one bite and immediately asked if I'd ordered them from a specialty bakery downtown. Watching her face light up as she tasted the layers made all the careful swirling and patience during the cooling process completely worth it. Now she requests them every holiday season, and I've started doubling the batch just to keep up with demand.
Ingredients
- Unsalted butter: Melted butter gives the brownie layer its signature fudgy richness, and using unsalted lets you control the saltiness perfectly.
- Granulated sugar: Sweetens both layers and helps create that shiny, crackly top on the red velvet base.
- Eggs: Room temperature eggs blend more smoothly into both batters, preventing lumps and ensuring even texture.
- Vanilla extract: A splash in each layer deepens the flavor and balances the cocoa with warm, aromatic sweetness.
- Red food coloring: This is what gives red velvet its iconic look, whether you use liquid or gel depends on how vibrant you want the color.
- All-purpose flour: Just enough to give structure without making the brownies cakey, keep it light and don't overmix.
- Unsweetened cocoa powder: Adds subtle chocolate depth without overwhelming the tangy cream cheese layer.
- Cream cheese: Softened cream cheese is essential for a smooth, lump-free cheesecake swirl that contrasts beautifully with the brownie.
Tired of Takeout? 🥡
Get 10 meals you can make faster than delivery arrives. Seriously.
One email. No spam. Unsubscribe anytime.
Instructions
- Get the oven ready:
- Preheat to 175°C (350°F) and line your 8x8-inch pan with parchment paper, leaving some overhang so you can lift the whole batch out later without a struggle. This little trick has saved me from so many stuck-on messes.
- Mix the red velvet base:
- Whisk melted butter and sugar until they're smooth and glossy, then add eggs, vanilla, and that gorgeous red food coloring until everything is evenly tinted. The smell of vanilla mingling with butter always makes my kitchen feel cozy.
- Fold in the dry ingredients:
- Sift in flour, cocoa, and salt, then fold gently just until combined. Overmixing turns fudgy brownies into tough ones, so stop as soon as you don't see dry streaks.
- Reserve batter for swirling:
- Scoop out about 1/4 cup of the red velvet batter and set it aside. Spread the rest evenly into your prepared pan, smoothing it into the corners.
- Prepare the cheesecake layer:
- Beat softened cream cheese until it's completely smooth, then add sugar, egg, and vanilla, mixing until creamy and lump-free. If you skip softening the cream cheese, you'll be fighting lumps for days.
- Layer and swirl:
- Pour the cheesecake mixture over the red velvet base and spread it gently. Dollop the reserved red velvet batter on top, then use a knife or skewer to create swirls, dragging through both layers in figure-eight motions.
- Bake until just set:
- Slide the pan into the oven and bake for 35 minutes, until the center barely jiggles and a toothpick comes out with moist crumbs. Overbaking dries out the fudgy magic, so watch closely toward the end.
- Cool and chill:
- Let the brownies cool completely in the pan on a wire rack, then refrigerate for at least 2 hours before slicing. Cold brownies cut cleaner and the flavors meld together beautifully.
 Save Pin
 One evening, I made these for a neighbor who'd just had surgery and couldn't leave the house. She called me the next day, laughing, saying she'd hidden the container from her husband because she didn't want to share. That moment reminded me that baking isn't just about following steps, it's about creating little pockets of joy in someone's day. These brownies have a way of doing exactly that.
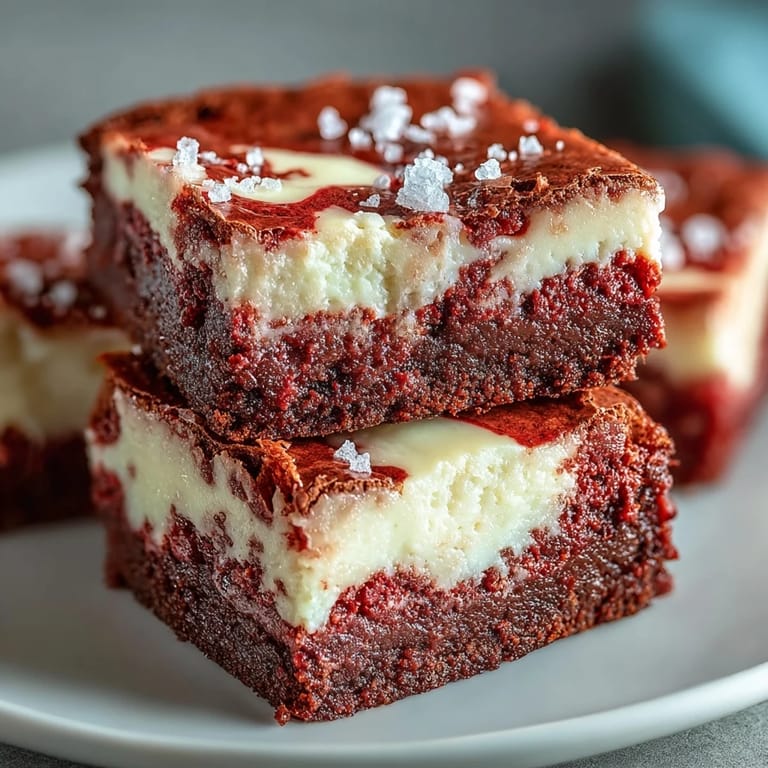
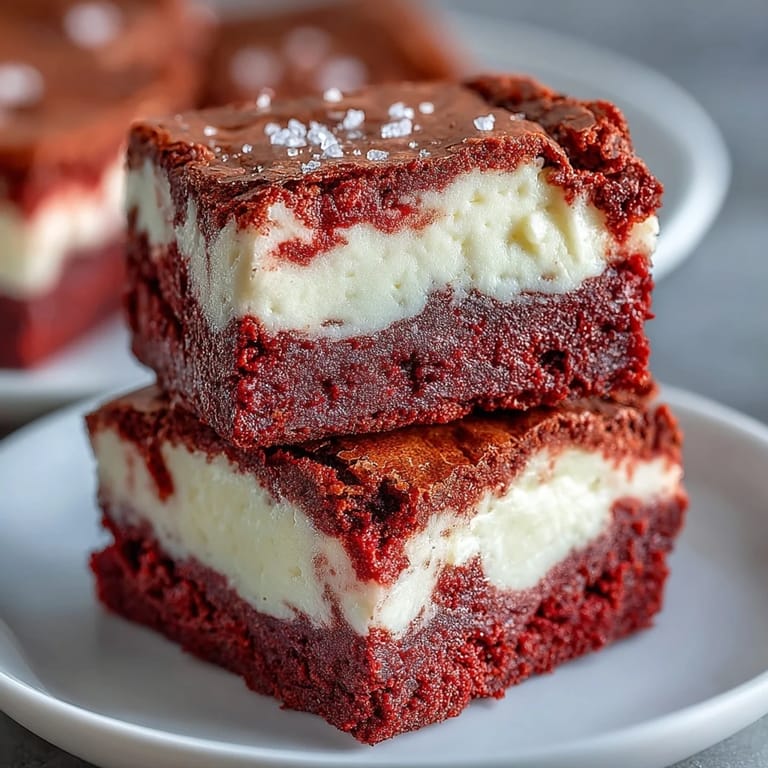
How to Get Perfect Swirls
The swirling technique looks intimidating, but it's actually forgiving and fun once you get the hang of it. I like to dollop the reserved red velvet batter in small spoonfuls across the cheesecake layer, spacing them evenly so every square gets some marbling. Then I take a butter knife or wooden skewer and drag it through the layers in loose figure-eights or S-curves, being careful not to scrape the bottom of the pan. The key is to swirl just enough to create visual interest without fully blending the layers together, you want distinct ribbons of red velvet threading through creamy white cheesecake.
Storage and Make-Ahead Tips
These brownies actually taste better the next day, after the flavors have had time to settle and deepen in the fridge. I store them in an airtight container between layers of parchment paper to keep them from sticking together, and they stay fresh for up to five days. If you want to make them ahead for a party, bake and chill them the night before, then cut them into squares the morning of your event. They also freeze beautifully for up to three months, just wrap individual squares in plastic wrap and thaw them in the fridge overnight before serving.
Serving Suggestions and Variations
I love serving these brownies slightly chilled with a dollop of whipped cream or a scoop of vanilla ice cream on the side. For an extra indulgent twist, you can fold white chocolate chips into the red velvet batter before spreading it in the pan, the melty pockets of sweetness take these over the top. Around the holidays, I sometimes dust the tops with powdered sugar or drizzle them with a simple cream cheese glaze made from powdered sugar, cream cheese, and a splash of milk.
- Try adding a teaspoon of espresso powder to the brownie batter to deepen the chocolate flavor without making it taste like coffee.
- For a fun presentation, cut them into smaller bite-sized pieces and serve them on a tiered dessert stand at parties.
- If you're feeling adventurous, swap the red food coloring for another shade and create custom-colored brownies for themed events.
 Save Pin
 Every time I pull a pan of these from the oven and see those gorgeous swirls set perfectly, I'm reminded why I love baking. There's something magical about turning simple ingredients into a dessert that makes people smile, and these Red Velvet Cheesecake Brownies do exactly that every single time.
Questions & Answers
- → Can I use natural food coloring instead of artificial dye?
Yes, you can substitute natural red food coloring, though the color may be less vibrant. Beet powder is a popular natural alternative, but it may slightly affect the flavor.
- → Why do my brownies need to be refrigerated?
The cheesecake layer contains cream cheese, which requires refrigeration for food safety. Chilling also helps the brownies set properly and makes them easier to cut into clean squares.
- → Can I make these brownies ahead of time?
Absolutely! These brownies store well in the refrigerator for up to 5 days in an airtight container, making them ideal for advance preparation before parties or gatherings.
- → How do I achieve clean cuts when slicing?
Use a sharp knife and wipe it clean between each cut. Chilling the brownies thoroughly before slicing also helps achieve neat, professional-looking squares.
- → Can I freeze these brownies?
Yes, wrap individual brownies tightly in plastic wrap and store in a freezer-safe container for up to 3 months. Thaw in the refrigerator overnight before serving.
- → What can I do if my cheesecake layer is lumpy?
Ensure your cream cheese is fully softened to room temperature before mixing. Beat it thoroughly until completely smooth before adding other ingredients to prevent lumps.